Wednesday, 23 February 2011

Get riggin' up in this bitch

The other role that I have in the team is the rigging of the swamp monster.  I began this by a process that I normally use for rigging humanoid characters, which is by applying a ROOT joint to the crotch area that will be used to select the whole rig.  I then created leg joints (hip, knee, ankle, heel, ball, toe) in the left leg that I duplicated over to right leg.  I parented both legs to the ROOT joint.

Next stage was to create joints directly from the ROOT that ran through the back, up to the chest and finally in the neck and head.  Here is how the rig looked now that I had applied it.

Next stage was to create joints and implement handles (IK and FK) in the left arm only.  There was no need to put joints in the right arm as that is mechanical and I used another method that I shall explain in greater detail in another post.

I put joints in the shoulder, elbow and wrist of the left arm.  I then parented the shoulder to the chest.  This monster was required to have both IK and FK handles; as the monster will need the free flowing movement of arms and legs that comes with FKs, along with the need to for the monster to climb and grab in the environment, which will be easier with IK handles.

I started by putting in the IK handle which ran from the shoulder to the wrist.  This meant that I could move the whole arm from a handle attached to the wrist.  
I then created a locator which I constrained to the IK Handle.  This will mean that the animator can control the angle of the arm and in particular the angle of the elbow, so that the monster can move in a flexible manor through the scene.

Next, I fitted the FK handles in the shoulder and wrist.  I did this by creating two curves that I put by those respective joints and then Parenting them.
In previous attempts to create FK Handles, I made the mistake of putting an FK Handle in the wrist as well, where the IK Handle was.  And this meant that if I switched to IK mode, it would start breaking apart and going out of place.  I soon discovered that I was only supposed to put curves in the shoulder and wrist, if I want both IK and FK.

In order to create a switch between the IK and FK handles, I created another curve, which I parented to the IK handle.  I created an attribute called IK Switch, and I created a driver, so that when the IK Switch was set to 1, the IK Handle could be used; whereas if it was set to 0, the IK Handle would be turned off. This means that the animator can now change between IK and FK easily and the monster can do whatever actions are required in the final project.

The rigging, as a process, is not yet complete but I shall document the next stages as I complete them.

Saturday, 19 February 2011

Manhole texturing

The last part of creating my manhole cover was the texturing.  The manhole had to be textured in such a way, that it would blend in with the live action footage; therefore I tried to work with fairly realistic texturing.  I started by using the mental ray renderer that is built into Maya, as it is made largely for photorealism.  I tried using one of the materials that came with mental ray that was called mi_metallic_paint.

The thing I didn't like about mental ray was that it wasn't as hands-on as many other methods of texturing and largely involves inputting numbers to configure.  And furthermore, the colouring of the material was solid and the rest of the group advised me to use texturing that was easier to render, but also had a colour scheme which blended together more naturally.

I then decided to create a texture from scratch in Photoshop by creating a PSD Network, and here was the first outcome.
This image consists of two images layered on top of one another.  The first was this simple background image that was originally a Stucco texture that I produced in Maya and then exported into Photoshop.  I added brown patches to the texture to create a rusting effect on the manhole cover.
I then searched Google for a high resolution image of rusting metal to Overlay on top in Photoshop, and I came across this one.
I learnt how to Overlay in Photoshop, thanks to my fellow team member, Nat.  It is a fairly simple process, which involves selecting how I want a certain layer to appear in a composition.

Here is how the 3D Model looks with this texture.
I added another layer on and I shaded in the central image and patters around the outside so they stand out more.  At first, we were satisfied with this outcome; however, when I we went back up to Kilburn to do filming, I decided to study the manhole texturing more closely to ensure that this model will fit in with the live action environment.

The manhole cover is actually made up of dark brown colours, and has very little rust.  My model almost looks like stone in comparison to most manholes.
I sampled the colours of this manhole and applied it to the stucco layer of my texture, as pictured below.
I also reduced the rusting texture effect that I had applied, and here was the outcome.
I have actually produced two versions of the model with this new texture;  the first with the rusty metal overlay as pictured below...
And the second, without a rusty metal overlay, and a more plain, solid look.
I will show these to the rest of the team and find out which one they think will fit in more with the scene. 

Wednesday, 16 February 2011

Manhole is fully modelled.

Here is the manhole model that I produced in Maya, using a Polygon cylinder as the base.  This piece involved a lot of polygon edge cutting in order to shape.

I have taken three shots of the model from the side, top and bottom.


Now I need to texture this to look realistic, but also perilous.  I will try out mental ray to see if I can achieve realism with that.  That should not take too long to render as I am thankfully only working with one model, as opposed to a scene full of models, as I experienced during my last group project.

Tuesday, 15 February 2011

Manhole cover

Here is the final design for the manhole cover, that I will also use as the template for modelling in Maya.

Monday, 14 February 2011

Manhole designs along with some inspiration

After I decided to be more adventurous with the design of the manhole to suggest the peril that lurks beneath, I began doing some sketches of possible manhole covers.

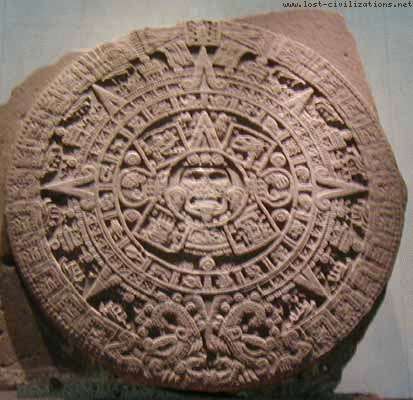
I was partly inspired by the use of ancient South American architecture in the Emperor's New Groove, and how it is used to convey mood, as well as hierarchy of the characters throughout the film.  I decided to borrow from this and I started looking at ancient South American design, particularly Aztec and Inca.

These images are both calendars, the one above is Aztec, whereas the one below is Inca.
A concept that I want to take from this was how there are continuous patterns around the outside of the design, consisting largely of simple shapes, yet there is a face that dominates the centre of these designs.  If you study many typical manholes, they too are made up of continuous patterns, consisting of very basic shapes such as squares, triangles and circles.


Well, in some places they do produce strange and interesting designs for manholes, but I will not get carried away, as this manhole cover needs to look realistic and be recognisable for what it is.  Therefore, I shall experiment with basic shapes to capture an essence of the swamp monster in the manhole, and include some continuous patterns around the edge of the image.

Here are some sketches that I have done of potential designs.  As I started to study Matt's model, as well as various swamp monsters, the central image began to gain a greater resemblance of a swamp monster.

In this image above, I started to work with positioning the patterns around the central image.  I was particularly intrigued by the innermost pattern around the second manhole photo, as it resembles screaming or scared faces.  Positioning these around the swamp monster image could highlight how this is a scary creature that is intimidating to all.


Eventually as I started to study swamp monster more closely, as well the the reference that Matt gave me, I began to create a more accurate image.  I also worked at making it as simplified as possible, so it would be a believable manhole cover.

I shall post up some more developed manhole designs as I do them.

Friday, 11 February 2011

First assignment: Manhole cover.

We have decided that we shall all take part in the modelling process and the first bit of modelling that I have been given to do is the manhole that the swamp monster bursts out of, or as a should be calling it, the Creature from the Black Lagoon.

I didn't have very many pictures that included the manholes in Kilburn but I came across this one.
As you can probably see from the bottom right corner, the majority of manholes around there are square and the design consists of smaller squares that are extruded from the base of the cover in straight rows and columns.

I started off by doing a test in Maya to figure out how I will make a manhole, complete with a cover that can easily be moved.  I did research into the thickness of a cover, as well as typical designs for a manhole cover.  This tests consists of a ground surface that is a simple PSD image and a Polygon cube that I created by drawing out a polygon surface with curved edges and then extruding the face to make a 3D object.  I applied a basic photo of a manhole cover on top using Planar Mapping.

Here is the outcome of that test:
Obviously, when I create the real thing, I shall take some more time to extrude a design into the model.  I will not just stick with photographic reference for the texturing, but I will probably look at making my own textures.

After talking with Natalia about possible designs for the manhole cover, she suggested that I look at this:
http://spitalfieldslife.com/2011/01/05/the-manhole-covers-of-spitalfields/.  There are so many different designs for manhole covers in London.

I then suggested that I move away from the "typical" design for manholes in that area of Kilburn Park try coming up with some designs for this specific manhole, that suggest that something perilous is about to emerge from below!  I was also inspired by a series of lectures that Fraser MacLean gave on how scenery, along with colour and lighting can be used in animation to focus the audience's attention on certain aspects within a scene; particularly within the films, The Emperor's New Groove and a Pixar short by the name, One Man Band.

The truth is that we have creative freedom in this piece.  As long as we understand what the rules are and stick to certain conditions, we should still experiment with using the elements that we design and model to have real relevance in our piece, and also to communicate the mood and atmosphere of our piece effectively.

I shall start coming up with designs for manhole covers soon and I will put them up in my next few posts.

Wednesday, 9 February 2011

Learning about green screen

Today, I went into uni and learnt about setting up green screen, particularly lighting the studio and also using tracking markers to measure the speed/distance of camera movements.  I helped in setting up the lighting and I also attaches tracking markers to the green screen.  The tracking markers are the white bits of tape stuck on the screen pictured below, 1 metre apart from one another, both horizontal and vertical.
The advantage of tracking markers is that if there is intended to be any camera movement in the piece, the rotation and speed of the movement can be judged by how the points move across the screen, and this movement can be matched in the movement in the CGI shot.

Unfortunately, we do not yet have hold of our parkour runner and we only have two days to film in the TV Studio as there is such huge security.  The good news is, however, that there is an alternative piece of technology called Chromaflex.  This is portable and can rented from our College shop.
Chromaflex involves a sheet of material, which I believe is made from tiny bits of glass.  This piece of material is illuminated with a green light that is attached to the camera, effectively turns the screen green, when filming.  This may be an option we will use when filming the shot where our parkour runner runs into a dead end.

Another option for getting hold of green screen capabilities is to purchase our own material.  Our tutor, Gareth recommended a shop in Soho called Borovick's where we can purchase green chroma material.  This all depends on how important the green screen sequences will be in our piece, but this will depend on how the storyboarding turns out.

We did some tests using green screen in the TV Studio, that consisted on me running in the same manner as our main character, along with some close up shots of action figures to see how the final shots of our piece may look.  Those are on the computers of the other team members so check out the other blogs if you want to see them.